Source on Github
 |
 |
#Introduction
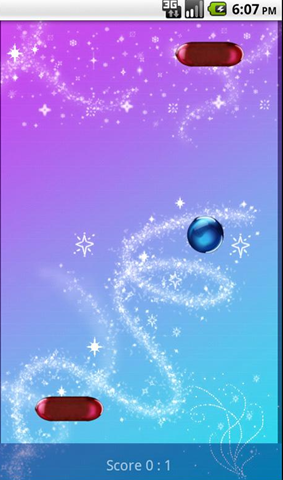
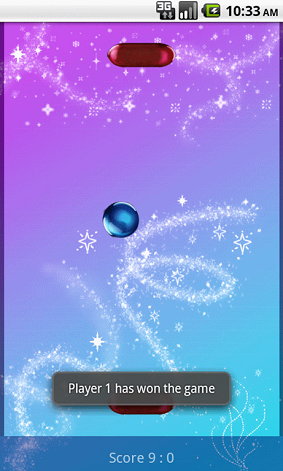
This article describes how I developed and published Androng, a clone of the classic game Pong that runs on Android. I developed the game using Java and it supports a single and two-player modes. I wanted to share how I developed the game from start to finish. By finish I mean actually publishing the game on the Android market. Above are two in-game screenshots.
##Pong
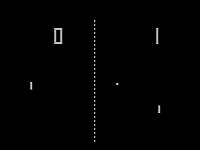
Pong is a game that was originally developed as an electronic version of ping pong. Atari originally created the game in 1972. The goal is to defeat your opponent by getting a higher score. You have to keep the ball in play and hope that your opponent misses it. In my implementation, whoever reaches 10 points first wins the game.
![]()
##Android
Android is an Operating System for mobile devices based on the Linux 2.6 kernel. Android Inc. developed Android, and Google bought Android in 2005. Although it is an Operating System for mobile devices, the Operating System itself is big. It consists of more than 12 million lines of code. Android supports a multitude of different mobile devices, and a special version of Android (version 3.0 Honeycomb) is available for tablet devices.
You can develop Android apps in C++ and .NET but most Android development is done in Java. The reason that I used Java is that it is close to C#, the language I use during my day job. To develop Java applications for Android, you need the Android SDK, the Java SDK, and an Integrated Development Environment (IDE) such as Eclipse or IntelliJ.
I used the community edition of IntelliJ, which is free. This is because during my day job I use Visual Studio and Resharper which share many similarities with IntelliJ. Resharper and IntelliJ share a lot of keyboard shortcuts, and they are both developed by the company JetBrains. Note, that although Java can be used for development, not all Java libraries are available, only those supported by the Android runtime.
#Android game development
When you start developing games on Android, you have three possible graphics implementations. You can use the drawable package and use a view or a canvas. On the other hand, you can use the OpenGL ES API that is a special implementation of the OpenGL specification for embedded devices. OpenGL ES includes support for 3D graphics. For Androng, I decided to use the graphics package and draw using a canvas. The canvas package is fast enough to support the animation and movement needed for this game.
#Activities
An Android application revolves around Activities and Views. An activity is a part of the application that provides a screen to interact with. An application can consist of multiple activities. Android starts the activity specified in the manifest of an application. This manifest is important, it is a configuration file that specifies the information the system needs before it can start your application. For example, which permissions are necessary for the application to run. When starting, Android calls the onCreate method of the specified activity. The source code below shows the main activity of Androng. All activities should derive from the Activity class.
public class AndrongActivity extends Activity
{
  private AndrongSurfaceView pongSurfaceView;

  @Override
  public void onCreate(Bundle savedInstanceState)
  {
    super.onCreate(savedInstanceState);
    setContentView(R.layout.main);
    pongSurfaceView = (AndrongSurfaceView) findViewById(R.id.androng);
    pongSurfaceView.setTextView((TextView) findViewById(R.id.text));
  }

  ....
}
#Views
A view creates the user interface of an activity and derives from the View class. A total view can consist of view groups and views. View groups are used to group views. They follow the Composite design pattern. The user interface of an application can consist of multiple views, a so-called hierarchy of views. You can use code or a resource file to define the layout of a view. The flexibility of your user interface increases by using a resource layout file. It becomes easier to maintain and include support for localisation. The layout resource file is implemented using XML. The resource file below shows the layout of Androng:
<?xml version="1.0" encoding="utf-8"?>
<FrameLayout xmlns:android="http://schemas.android.com/apk/res/android"
    android:layout_width="match_parent"
    android:layout_height="match_parent">
    <net.semantic.games.AndrongSurfaceView
      android:id="@+id/androng"
      android:layout_width="match_parent"
      android:layout_height="match_parent"/>
    <RelativeLayout
        android:layout_width="match_parent"
        android:layout_height="match_parent" >
        <TextView
          android:id="@+id/text"
          android:text="Androng"
          android:visibility="visible"
          android:layout_width="wrap_content"
          android:layout_height="wrap_content"
          android:layout_centerInParent="true"
          android:layout_alignParentBottom="true"
          android:layout_marginBottom="10px"
          android:gravity="center_horizontal"
          android:textColor="#99FFFFFF"
          android:textSize="16sp"/>
     </RelativeLayout>
</FrameLayout>
All layout types are viewgroups and are used to create hierarchical models. Androng uses a FrameLayout which is the simplest layout object. A FrameLayout is a blank reserved space on the screen that can be filled with one object. All the child objects are pinned to the left top corner. It is not possible to specify a location for a child; each consecutive child is drawn over earlier objects which can obscure the previous one.
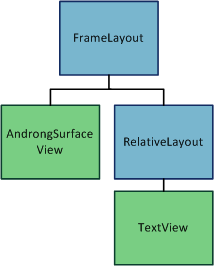
In the case of Androng, the AndrongSurfaceView and the TextView are drawn on top of each other. Loading the XML in the user interface is done in the onCreate method of the activity setContentView(R.layout.main); where R.layout.main identifies the XML file in the resource.
Other layout types are possible. There is a LineairLayout, a RelativeLayout, a TableLayout, and an AbsoluteLayout. Each of these layouts have their own strength. Using the AbsoluteLayout for your application is not recommended because it may look good on your device but may well differ on another device.
We now have a user interface, let’s see if we can draw resources to the screen.
#Drawing using Canvas
Before you can draw a resource on to a canvas, you need to have a resource to draw and acquire a canvas to draw upon. The Canvas is acquired using a SurfaceView, this is a drawable surface that lies beneath the active view window. For Androng, I implemented a class named AndrongSurfaceView which extends SurfaceView, this is the same view as mentioned in the layout file. The source code below shows a part of the AndrongSurfaceView class.
public class AndrongSurfaceView extends SurfaceView
       implements SurfaceHolder.Callback
{
  private AndrongThread androngThread;
  private TextView statusText;
  private SurfaceHolder holder;
  private Context context;

  public AndrongSurfaceView(Context context, AttributeSet attrs)
  {
    super(context, attrs);
    this.context = context;
    this.holder = getHolder();
    holder.addCallback(this);
    setFocusable(true);
  }

  ......

}
By calling a method lockCanvas on the SurfaceHolder, we get an instance of the Canvas class which can be used to manipulate the pixels on a surface. The SurfaceHolder can be retrieved using getHolder() in the AndrongSurfaceView class.
Canvas canvas = surfaceHolder.lockCanvas(null);A resource can be obtained through the context of the application. For example, the following source code draws the background of the game in each frame.
Bitmap backgroundImage = BitmapFactory.decodeResource(resources, R.drawable.background2);
canvas.drawBitmap(backgroundImage, 0, 0, null);
#Animation
In Androng, the ball is animated. The animation consists of 12 frames, every frame rotates the ball 30 degrees. When the ball hits a paddle or the side, the animation reverses. This creates a nice animation effect of the ball in the game.

Android has built-in support for animation. It has animation properties in which you can set a start and end value of a property of an object. And there is also frame animation using AnimationDrawable. Frame animation shows a sequence of images in their defined order. The animation of the AnimationDrawable must be defined in XML.
The problem with this Frame animation was that you can set the duration of the animation in the XML file but you cannot set the animation speed. In Androng, I wanted to reverse the animation whenever the ball hits something. Therefore I decided to implement the animation myself.
public class Sprite
{
   protected DrawableResourceCollection drawableResourceCollection;
   private int currentFrame;

   public void draw(Canvas canvas)
   {
      drawableResourceCollection
         .get(currentFrame)
         .setBounds((int) xPosition,
                    (int) yPosition,
                    (int) xPosition + getWidth(),
                    (int) yPosition + getHeight());
      drawableResourceCollection.get(currentFrame).draw(canvas);
      currentFrame = GetNewFrame();
   }

   ...
}</pre>
Sprite is the base class used for all animatable objects such as the ball and the paddles. Each sprite has a DrawableResourceCollection which consists of a list of drawable resources.
public class DrawableResourceCollection extends LinkedList<drawable>When the draw method of the Sprite is called, a Drawable resource is retrieved from the DrawableResourceCollection and is drawn on the canvas. The GetNewFrame() determines the index of the next frame from the resource. The GetNewFrame() method uses a boolean animationForward which as the name implies determines if the animation is moving forward or backwards. This way we can easily reverse the animation direction by changing this boolean from true to false, or vice versa.
#Frame speed independent animation
Android runs on many devices, each with their own hardware specification. This means that the processing speed of the devices that run your application will be different. This in its turn means that the animation speed of a sprite, such as the ball of the Androng game, differs per device. This is an unwanted situation, game play could differ per device. Therefore, we want to animate the game independently of the processing power of the device. We achieve this by incorporating time into the application and specifying animation speed in pixel movement or animation speed per time.
#Getting high-resolution timing from Android
There are three different ways to get time from the Android OS:
currentTimeMillis()upTimeMillis()elapsedRealtime()
The first, System.currentTimeMillis(), expresses the number of milliseconds since the epoch. Epoch on Unix based systems is January 1, 1970. This obviously depends on the current time of the device; when the time switches due to the phone network synchronisation or due to a user action, this number jumps back or forth.
The second, System.upTimeMillis(), is the number of milliseconds since the device is booted. This clock stops when the device goes into sleep mode, but isn’t affected by time shifts.
The third and last option is elapsedRealtime(), this is also the number of milliseconds since the device booted. The difference with the second option is that this keeps running when the device goes into sleep mode.
For our frame speed independent animation, I chose upTimeMillis() because the first option may jump forward or backward, which is not good for calculating the frame speed, and the third option keeps running while the game is paused, which is also troubling for calculating the frame speed. The following code calculates the number of frames per second using the second option.
while (isRunning)
{
  currentTimeInMillis = System.upTimeMillis();
  double timeNeededToDrawFrame =
        (currentTimeInMillis - previousTimeInMillis) / 1000;
  previousTimeInMillis = currentTimeInMillis;
  DrawFrame(time);
  UpdatePhysics(timeNeededToDrawFrame);
}
The result, the variable timeNeededToDrawFrame, is sent to all the objects that make up the game screen. For example, the ball receives this and has a speed of two horizontal pixels per second. By multiplying this with the time needed to draw this frame, we get the number of pixels that the ball should move. The same is done with the vertical speed. This enables frame speed independent animation.
#Collision detection
Most, if not all games need collision detection. There are many ways of detecting if two game objects collide. Androng combines both the bounding box and the pixel methods.
#Bounding box hits detection
The bounding box method can be easily illustrated with the following picture:
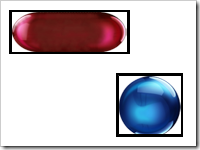
The following algorithm detects if the virtual boxes around each sprite overlap:
  if (bottom1 < top2)
  return false;
if (top1 > bottom2)
  return false;
if (right1 < left2)
  return false;
if (left1 > right2)
  return false;

//bounding box do overlap
The bounding box collision detection algorithm is a fast way to detect a collision, but if the shapes are not rectangular such as the ball, we could get false positives. For example, in the following situation, the bounding box detection would detect a collision while in fact there isn’t one.
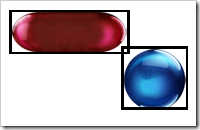
#Pixel perfect detection
We could solve this by using a bounding circle for the ball, but I wanted to solve this using a more generic approach, using the pixels of the sprite. Therefore, when the bounding box algorithm detects a collision, we scan the overlap in both sprites for pixels. If the same location in both sprites contains a pixel (color != 0), we have a collision.
![]()
The algorithm determines the width and height of the overlapping box and where in each sprite the box is. The algorithm scans each pixel in the box for a collision. Reading the pixel from the bitmap is possible by calling the getBitmap() method on the Drawable. See the method collideswith of the sprite class in the source code for the full collision detection routine.
#Sound management
Androng plays a sound whenever the ball collides with a paddle, the wall, or when a player scores. Playing a sound using Android is easy. The media player or Sound Pool classes can play sounds. I used the Sound Pool classes because they offer more flexibility. Playing sounds using the Sound Pool classes involves the udioManager; the AudioManager is a so called Android system service. The source code below shows how to get the AudioManager system service and play the media file “hit”. Hit is played when the ball hits a paddle or the side.
AudioManager mAudioManager = (AudioManager) mContext.getSystemService(Context.AUDIO_SERVICE);
SoundPool mSoundPool = new SoundPool(1, AudioManager.STREAM_MUSIC, 0);
mSoundPool.play(R.raw.hit, streamVolume, streamVolume, 1, 0, 1);
All the sounds of the game are pre-loaded into a SoundPoolMap and are played from this SoundPoolMap. All sound management methods are grouped into a single class SoundManager; see the source code for the class. The class is based on an example provided by Stephen Flockton, who writes a blog around Android development.
#Input management
The game can be controlled using the touch screen of an Android device, this is called the touch mode. The touch mode is activated if you touch a button on the screen with your finger. Handling touch mode events is as simple as overriding the onTouchEvent of the SurfaceView. The signature of onTouchEvent is shown below:
public boolean onTouchEvent(MotionEvent event)This event gets thrown when you touch the screen with one or more fingers. The MotionEvent argument has a method called getPointerCount(), which returns the number of fingers that are placed on the screen. Although, this actually depends on the capability of the device and the version of Android. Androng has a two player mode where two players can play against each other using their fingers on the same device. In this mode, the getPointerCount() method is used. If there are two fingers touching the screen of the device, index = 0 represents the first finger, while index = 1 represents the second finger. Using the index in the method getX() or getY() on the event, the position of the fingers can be determined.
float xPosition1 = event.getX(pointerIndex);
float yPosition1 = event.getY(pointerIndex);
xPosition1 and yPosition1 are used to place the paddle on the screen.
#Notifications
Androng uses Toast notifications to tell the user about certain events such as how to start the game and which player has won the game. A toast notification is a message that pops up on the surface of the window. The message automatically fades in and out and stays on the screen for a predetermined amount of time. The following code places a toast notification on the Androng game screen.
Toast toast = Toast.makeText(context, "Select Menu for a new game.", Toast.LENGTH_LONG);
toast.show();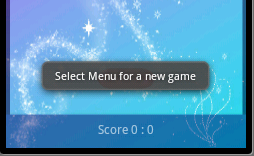
The constant Toast.LENGTH_LONG, according to the Android documentation, will say to Android that the text notification should be shown for a long period. The default, Toast.LENGHT_LONG, corresponds to 3.5s. Show() will actually show the text on the screen.
#Application life cycle management
As Android is an Operating System for mobile devices, it needs special attention for managing the scarce resources of such a device. Each Android application runs in its own process and is able to perform a specific task. A task can consists of multiple activities. Each Android application should manage the Application lifecycle. For example, it is possible that the Android OS decides to suspend or destroy your application when it needs extra resources. Therefore, your application should be able to save and restore its state when this is needed.
#Activity life cycle
As mentioned before, an Android application consists of activities; it is in these activities you should manage your application’s lifecycle. There are three possible scenarios possible for starting or restarting your application.
| Fresh Start | Fresh Restart | Restart From Pause |
| onCreate | onRestart | |
| onStart | onStart | |
| onResume | onResume | onResume |
All these “on*” methods are part of an activity. The Fresh Start scenario happens when you normally start your application. The Fresh Restart scenario happens after Android has stopped your activity, just before it starts again. The last scenario, Restart From Pause, happens when the system is about to start resuming a previous activity. When another application gets to the foreground, your activity gets paused. This shows a total graphical overview of the application life-cycle.
Note that when you change the orientation of an Android device, your application gets restarted.
For the first version of Androng, I decided not to save the state of the game when the game is destroyed by the Android Operating System. When the game is paused and restarts, I simply restart the Androng game thread.
#Restart thread
Drawing of the game screen and physics calculation runs on a separate thread. This AndrongThread derives from Thread.
public class AndrongThread extends Thread
{
  @Override
  public void run()
  {
    long startTime = SystemClock.uptimeMillis();
    while (isRunning)
    {
      ...
    }
  }

  ...
}
The thread runs continuously in a loop guarded by a single boolean isRunning. When the program stops, the isRunning boolean gets set to false and the thread stops running. In the method surfaceDestroyed that gets called by the Android OS, I wait using a Join() statement.
public void surfaceDestroyed(SurfaceHolder surfaceHolder)
{
  androngThread.setRunning(false);
  boolean retry = true;
  while (retry)
  {
    try
    {
      androngThread.join();
      retry = false;
    }
    catch (InterruptedException e)
    {
    }
  }
}
The method sets the boolean isRunning to false using the setRunning method, this stops the thread from running. Next, the code calls androngThread.join() which according to the documentation blocks the current thread until the receiver finishes its execution and dies.
Exactly the behavior I was looking for. However, during a restart or resume of the application, I got the error “Thread already started” while trying to (re)start the thread. It seems that the join statement succeeded but did not stop the thread. There are other methods available on the thread class such as stop() and destroy() but according to the documentation, they are all deprecated and shouldn’t be used. I decided to solve this problem while creating the thread.
The code below shows my solution; it is not elegant, but works.
public void surfaceCreated(SurfaceHolder surfaceHolder)
{
  androngThread.setRunning(true);
  try
  {
    androngThread.start();
  }
  catch (Exception error)
  {
    androngThread = CreateNewAndrongThread();
    androngThread.start();
    androngThread.setRunning(true);
  }
}
The method tries to start the thread; when it fails, the exception handler creates a new thread and starts the newly created thread.
#Android Market
I wanted to publish Androng on the Android Market. Android Market is an open distribution platform for Android applications. Open means that your applications are not policed and there is no approval process. The visibility of your application depends on the rating you get from customers. Android Market is not the only distribution platform for Android applications; another publication channel is Amazon. Currently, the Amazon market is only open to customers from the United States.
There is a one time $25 registration fee before you can publish your games on the Android Market. Besides that, for every app sold on the Android Market, Google receives a 30% fee. Which to my opinion is reasonable compared with other publication channels. The image below shows the publisher screen for Androng. Androng is free and can be downloaded from the Android Market.

The community edition of IntelliJ gives you the opportunity to package the application. Before you publish your application, you must sign the application using a public private key combination. Updates of the application must use the same key for signing. This package with the .apk extension can be published on the Android Market. You have to fill in some fields before publishing, such as the description and some screenshots, logo’s etc. If you have an Android phone, you can download the game here via Android market.
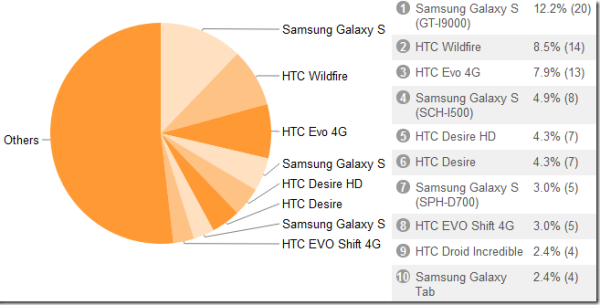
The nice thing about Android market is that you get insight into the users of your application. It shows if the users get any errors, which Android versions they use, and the type of devices they have. For example, the screenshot below shows the type of devices that have downloaded Androng.
#Source code
The source code of Androng is available on Github. If you use the community edition of IntelliJ, you can open the project file. Otherwise, you can open the individual source or Java files.
#Next version
For the next version of Androng, I have the following features planned, in no particular order.
- Usage of a real physics engine such as Box2d or AndEngine
- High score list, with central storage on the web
- Usage of Google-guice for dependency injection
- Increased freedom of movement of the bats
- Support for Android version 1.6
- Creation of a promotion video